Use the Table of Contents to jump boss-to-boss.
Difficulty-specific mechanics are under Accordion items.
Preparation
Check Tech Fragments + OP‑1 before running EV.
Expect ~2,200 TF and ~100 OP‑1 (approx.)
Basic Requirements
All operations require:
- Level 80
- An active subscription
Story | Veteran |
324 Item Rating | 324-344 Item Rating; Legendary Implants (326+) |
Eternity Vault is currently only available in Story and Veteran difficulties.
Weekly Mission
Aid the Republic or the Empire by defeating each boss in Operation: The Eternity Vault on (Story) or (Veteran) difficulty.
Tasks:
- Defeat the Annihilation Droid
- Defeat Gharj
- Solve the Ancient Pylon Mystery
- Defeat the Infernal Council
- Defeat Soa
These missions can only be repeated a certain amount of times per week.
Mission Rewards:
- OP-1 Catalysts
- Columi Upgrade Cache (Optional)
[WEEKLY] Eternity Vault (Story)
[WEEKLY] Eternity Vault (Veteran)
One Time Quest
For understanding on why you are breaking into the Rakata prison, take the 1 time quest. Recommend your first time. Don't space bar the cut scenes.
To pick up the One Time Quest, speak to General Threnoldt for Imperial, and Colonel Fhorjak on Republic side. They are located near the Eternity Vault entrance.
Fleet > Fleet Vanguard Vessel > Mission Deck > General Threnoldt
Fleet > Fleet Vanguard Vessel > Mission Deck > Belsavis Operations Hangar > Colonel Fhorjak
Departure Location
First head to your Fleet Vanguard Vessel, this will be either the Fleet Ziost Shadow for Imperial or Gav Daragon for Republic players to head to the departure door.
Gav Daragon | Ziost Shadow |
|
|
|
Boss List
- Annihilation Droid XRR-3
- Gharj
- Ancient Pylon Mystery
- Infernal Council
- Soa
Annihilation Droid XRR-3
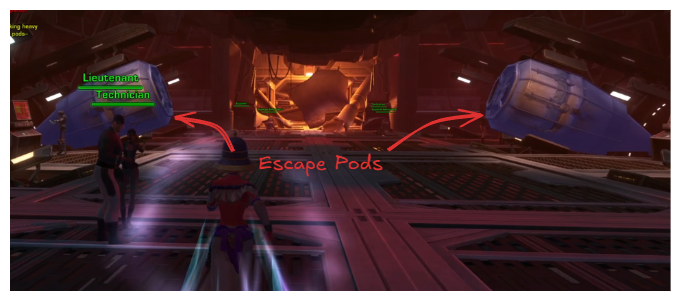
Once you load into the instance, there are several escape pods located along both sides of the ship. Click on any pod and jump down to the surface.
On the surface, find an area resembling a narrow ice bridge. Stay here and wait for your team; otherwise, you risk engaging the 2 Turret Towers. If you pass the 'C' on the ground, you will engage the turrets.
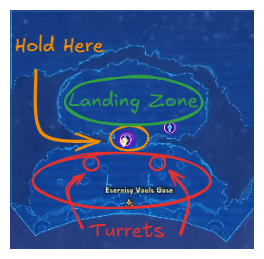
Turret Towers (Pre-fight) The two turret towers mentioned above guard Droid XRR-3. These turrets are not excessively difficult to overcome, but they do have power sources beneath them.
- Melee: Focus on destroying the power source.
- Ranged: Target the turret tower itself.
- Kill order: Power Sources -> Turrets (melee can swap/idle during turret cleanup).
“Proximity Violation” (Stomp / Sweep) When XRR-3 says “Proximity Violation,” you will see one of two abilities:
- Stomp: Deals damage to players in melee range.
- Sweep: Deals damage and knocks players in melee range back several meters.
Tank Positioning For tanks, positioning is the main objective.
- To mitigate how far XRR-3 can knock you back, stand diagonally from the door frame at the back of the area.
- The tanks back should be facing the wall (not the door) in order to remain within leap distance after the knockback.
- This positioning helps you use movement/jump abilities to get back to XRR-3 quickly.
- After the tank is knocked back, XRR-3 may force a target change. Re-engage and taunt back quickly.
“24 Distinct Weapons Technologies” (Raid-wide AoE) At this stage there is a raid-wide AoE that affects all players.
- Group up near the tank/boss for AoE heals.
- Ranged DPS should also join the group for AoE heals.
- Note: Snipers/Gunslingers can sometimes ignore this and passively heal through the damage with DCD usage.
Roles (during “24 Distinct…”)
- Damage
- Group up for AoE heals.
- Use light DCD's and reflects if you have them.
- Once the ability ends, leave melee range to avoid knockback effects.
- Heals
- Prepare and use AoE heals.
- If players are outside your AoE, call them in or pull them into range.
- Tank
- Maintain positioning.
- Maintain threat.
- Use a light DCD.
“Storm Protocols” (Missile Ground Markers) During this stage, XRR-3 will dispatch missiles to each player’s location.
- You don’t need to move far—just step out of the marker under your feet.
Grenade Debuff Ranged DPS and healers: look out for the red grenade debuff.
- If you have it, move away from other players.
Same mechanics as Story
Gharj (Heal Check)
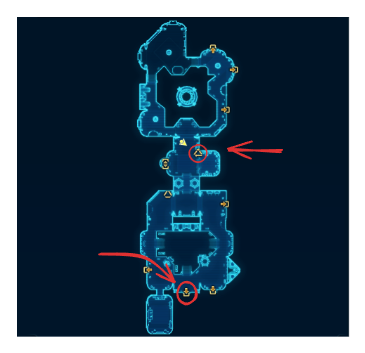
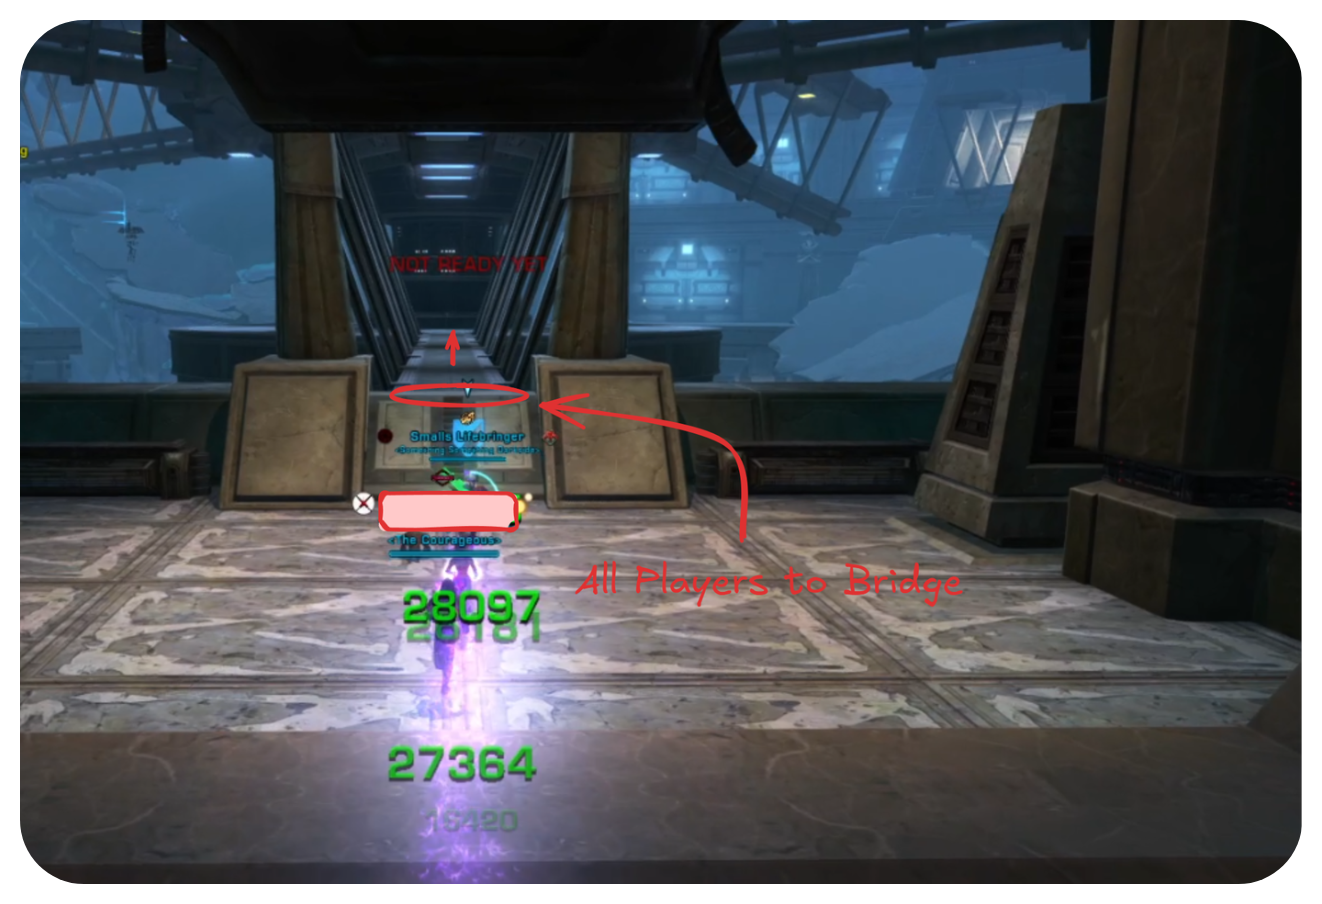
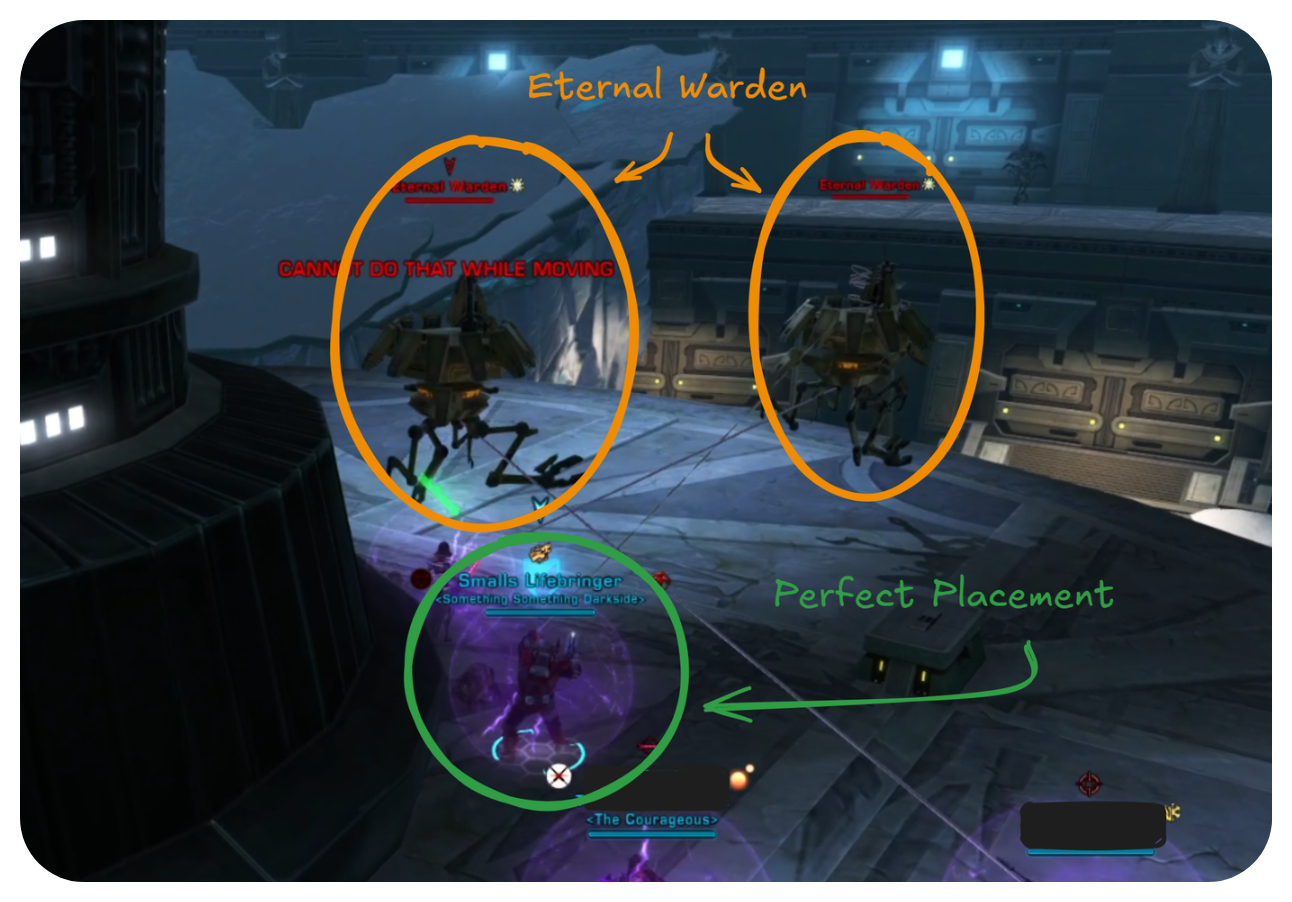
If there are no stealth players, then all players move towards the bridge in the next room. Once to the next platform. Position your back towards the pillars. The Eternal Warden enemies have knock back abilities.
First travel to the first bridge inside the Prison Block. Once across the bridge, continue in a clockwise fashion around the rest of the Prison Block,
Environment / Arena Gharj starts in a lava-filled room. The pathway up to the platform is made of rocks you have to jump across.
- Touching lava applies a DoT that continues for 2–3 ticks after leaving lava.
- Lava falls are instant kills if touched.
Cleave The boss cleaves. Tank points the boss away from the group. Everyone else stays behind the boss.
Leap (AoE) Gharj leaps and deals AoE damage around the impact.
- Tank holds boss on one end of the platform.
- Ranged + healers group on the far side for AoE healing.
Pulverizing Smash Minor damage + knockback. Usually safe to ignore—just get back to the platform quickly.
Adds Adds spawn from all sides.
- If the group is stacked at one end, ranged can swap to adds targeting them/healers.
- Melee can cleave/AoE or help focus them down.
Frenzy / Platform Swap At certain points Gharj enters a frenzy:
- Platform shakes
- A new pathway and platform appear (randomly at either end)
- Old platform/path disappear
Priority is moving to the new platform. AoE adds once you stabilize on the new platform. Only delay moving if the path forces you past the boss and a leap is about to happen.
No new mechanics in Veteran Mode; this is a healing check boss fight.
Ancient Pylon Mystery (Puzzle)
Follow the path north after the tunnel to the first group of cats; kill them. They have a knockback ability but are otherwise harmless.
Continue straight to second group of cats, taking care not to aggro other packs. Again, kill cats.
By this time, you will have reached a lava river; directly below is a rock bridge. Jump down, cross, and jump up. Jumping up requires a little skill/luck but can be made easier by mounting up.
Left frame heads to the nearest (north) pylon (straight ahead), right frame heads back along the river (south) until they reach a large tree bent over. Jump onto tree, continue forward past the cliff, and continue to the (south) pylon.
At each pylon are three mobs. Easily killed, no need to worry here. They can stun but cannot damage while channeling their stun.
Important Information:
Each pylon has:
- 1 central column and 2 outer columns (the outer columns match each other)
- A button under either outer column rotates the central column
- A button under the central column attempts to lock the current row
Goal Match the central color to the two outer colors, then lock it. Do this for each row bottom to top. When both pylons are locked correctly on the same row, you can move to the next row.
Colors Blue, Green, Red, Purple, White, Yellow
Memory trick: BGRPWY (“Blue GRouP, WhY?”)
- Put the tank and healer in separate frames clicking buttons (one at each pylon).
- On Story, groups can almost always spam Left to solve quickly.
- Locking / Selecting a color is not affected by the click debuff.
- You need 3 clickers: tank + healers + at least one DPS.
- Clickers get a debuff that takes about ~1.5 button presses to wear off, so rotate clickers.
Adds / Wipe Pressure
Waves spawn during pylons:
- Rakata troopers (melee, have a channeled stun)
- Acklays
Wipe condition If you reach the wave with three Acklays, the group wipes (time/pressure check).
Recommended target plan
- Each DPS quickly kills their own trooper
- All DPS then converge to burn the Acklay(s)
Ancient Pylon Mystery (Solver)
Just want the solver? Visit our dedicated solver page:
https://ssdguild.com/solver
Infernal Council (Self‑Sustain Check)
Core Rule (Read This First) There are 8 champions in the room. When you hit a champion, you claim it.
If you:
- Hit a champion that is already claimed, or
- Heal a player who has a claimed champion (while you don’t match)
…you get a debuff that prevents any damage or healing you attempt.
Debuff Details
- Lasts 60 seconds
- Refreshes if you hit/heal while it’s active
So once you mess it up, you can are “locked out” for a full minute.
Before You Start
- Click off any buffs applied by other players (example: Kolto Shells) before the pull.
- No raid buffs in this fight.
- Annihilation Marauders / Watchmen Sentinels should be moved to their own frames (so they don’t accidentally interact).
- Tanks and healers are recommended to respec to DPS builds.
16-Man Note
- There are two additional bosses in each corner.
- Avoid putting AoE-heavy players in the corners.
Assignments
- Pair tanks with Juggernauts
- Pair healers with Assassins
- DPS claim the remainder
Starting the Fight
- One player clicks the terminal to begin.
During the Fight
- Kill your own claimed boss.
- Once your boss is dead: wait.
- If you do not have the debuff, you may assist with a single hit (do not spam).
No different mechanics; bosses have more health and hit harder.
- After defeating your champion, you may seek an unclaimed champion and claim it.
- Communicate with the group before claiming to avoid messing up other players’ assignments.
Soa
Overview Soa is split into 5 stages:
- Phase 1
- Transition (Stairs)
- Phase 2
- Transition (Stairs)
- Phase 3
Phase 1 (to 75%)
- Phase 1 begins when you hit the boss.
- This is a simple DPS check down to 75% and then retreat to the starting edge.
- Use your raid buff if you have one; it will be up again for the final burn phase.
- Green floor spread (DoT): pylons glow and spread green across the floor. Move out of it.
- You can sometimes DPS lower than 75% (as low as ~60%) because the shield cast has delay.
- Shortly after the shield is cast, everything except the outer ring falls. Anyone in the middle drops to their death.
Transition (Stairs)
- Platforms fall below you; drop down as they appear.
- Group up for AoE healing (can be intensive with a solo healer).
- Off-healing and passive healing are strongly advised.
- Platforms include pylons.
- Soa has a number of buff stacks equal to the number of pylons.
- Killing a pylon removes a stack.
- Pylons do not need to be killed in order.
- If more than one player kills pylons, Soa can bug and not lose stacks.
- Assign ONE player to kill pylons.
- (In practice the buff is minor, but the bug risk is real—single assignment avoids it.)
Phase 2 (to 35%) Same as Phase 1, ending at 35%, with these exceptions:
- Mind Traps: trap a player. DPS should kill these when possible.
- Lightning Orbs: target a random player.
- If targeted: run out of the group and pop a DCD.
- “Washing machine” throw: a random player is picked up and thrown around, then dropped.
- Run back through the middle (faster), or along the edge if nearing transition.
- A friendly pull can help (Sorc/Sage or PT/VG tank).
Transition Same as the first transition.
Phase 3 (Ground level)
- Similar mechanics, but:
- No washing machine.
- Soa is shielded most of the time.
- DPS priority:
- DPS should target Mind Traps only.
- Only hit Soa if needed to maintain class resources/stacks (e.g. Tactical Advantage), and to help the tank hold threat.
- Pylon drop window
- A circle appears ~10 seconds before a pylon drops.
- Once the pylon drops on Soa, he’s vulnerable for ~15 seconds.
- Raid buff + burst during the window.
- If Soa shields again (or pylon missed), repeat.
Death / Recovery (Important) IF YOU DIE DURING SOA:
- Do not resurrect in-phase.
- Resurrecting forces a long travel path and a fall-death chain.
- Instead rez out of phase (or exit area) and re-enter; you’ll be teleported to the ground and can safely loot.
- Phase 1 can also begin by running through the door in Veteran.
- In Phase 3, the pylon will damage and knock back any player under it.
- Do not stand on the outside edge, or you may get knocked into the lava.
- Tanks should have shadows enabled as well be watching for the dromond pointy spinning shadow. The tanks positions boss into this shadow to release boss shield
Stealth Skip to Gharj Boss
To stealth past “Trash” enemies, you need at least one stealth player. This person will either need to make a long jump, or someone with friendly pull abilities will need to pull the stealth player across the distance.
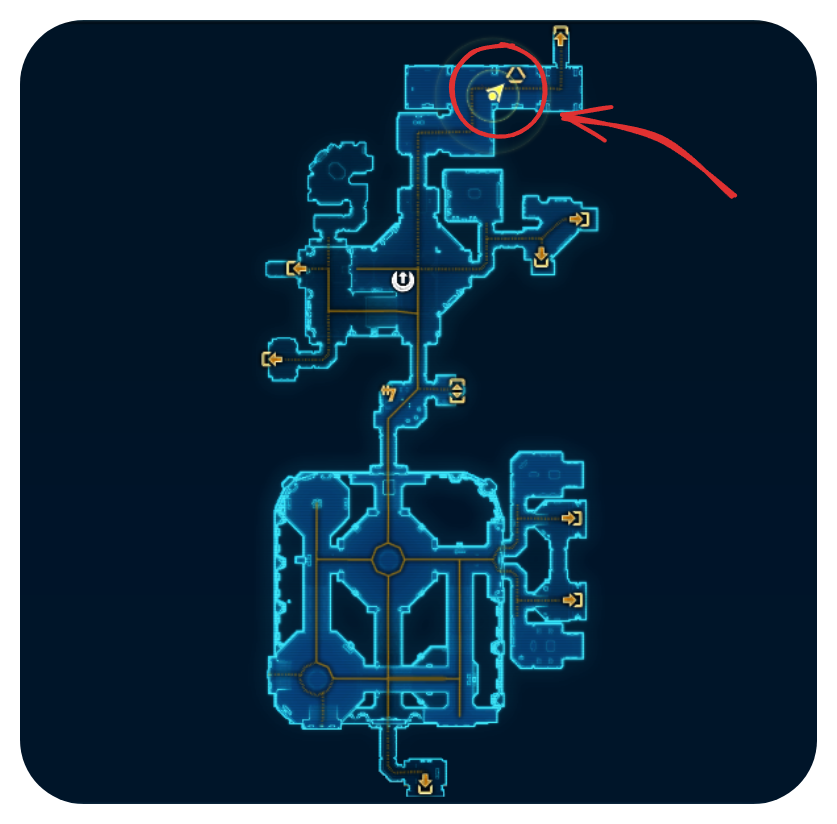
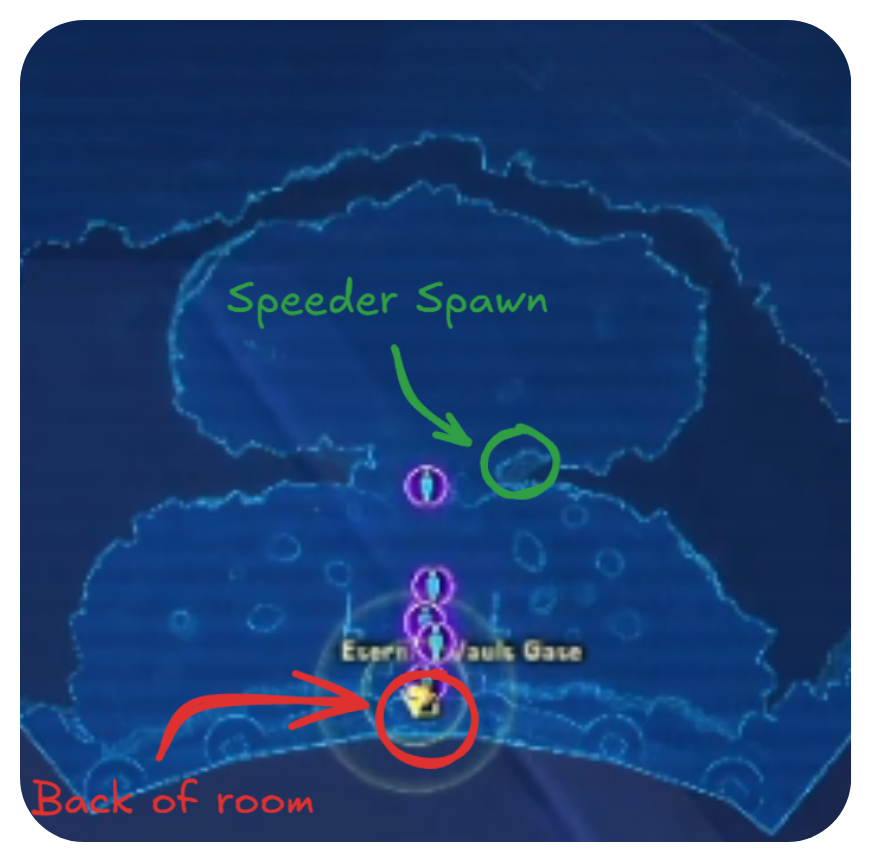
If your team has a stealth player and you want to skip the trash, all players except the stealth (and their puller, if needed) go back to the “Speeder Spawn.”
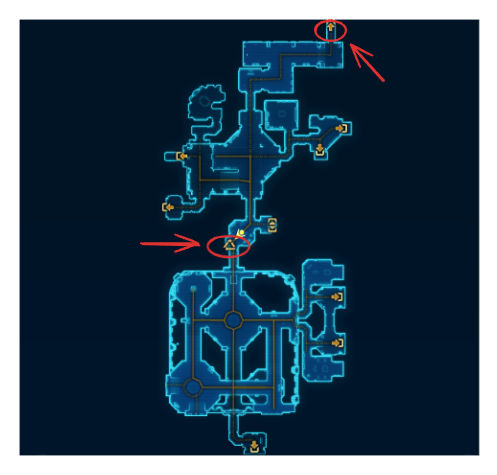
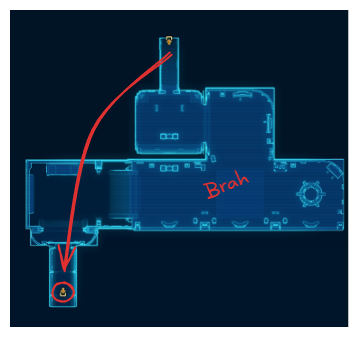
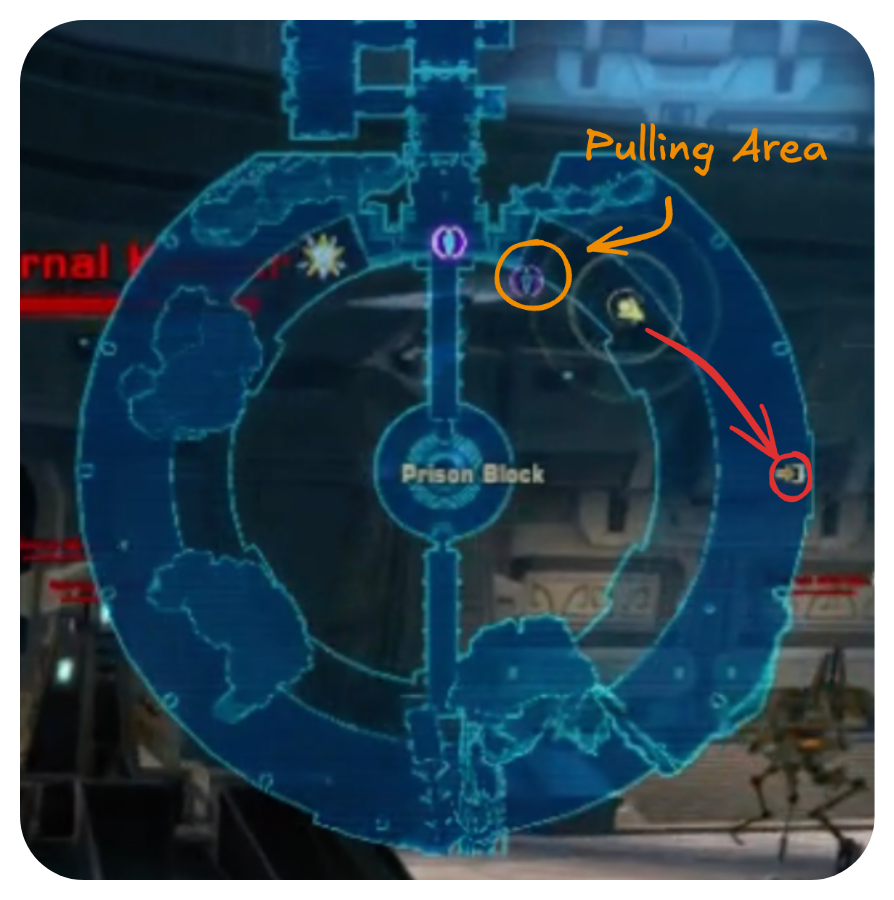
Stealth player and pull player(if needed) go inside the facility and travel to the first long bridge. But don’t cross it. Climb up the side of the bridge area to the left.
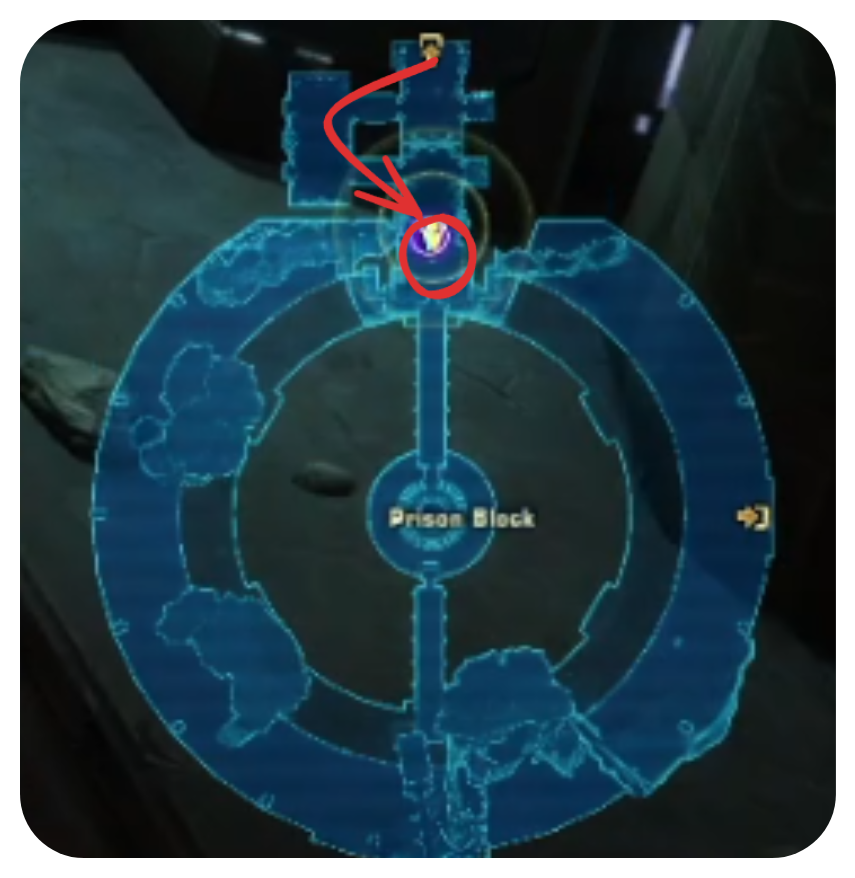
To begin the stealth skip, navigate to the first bridge in the Prison Block.
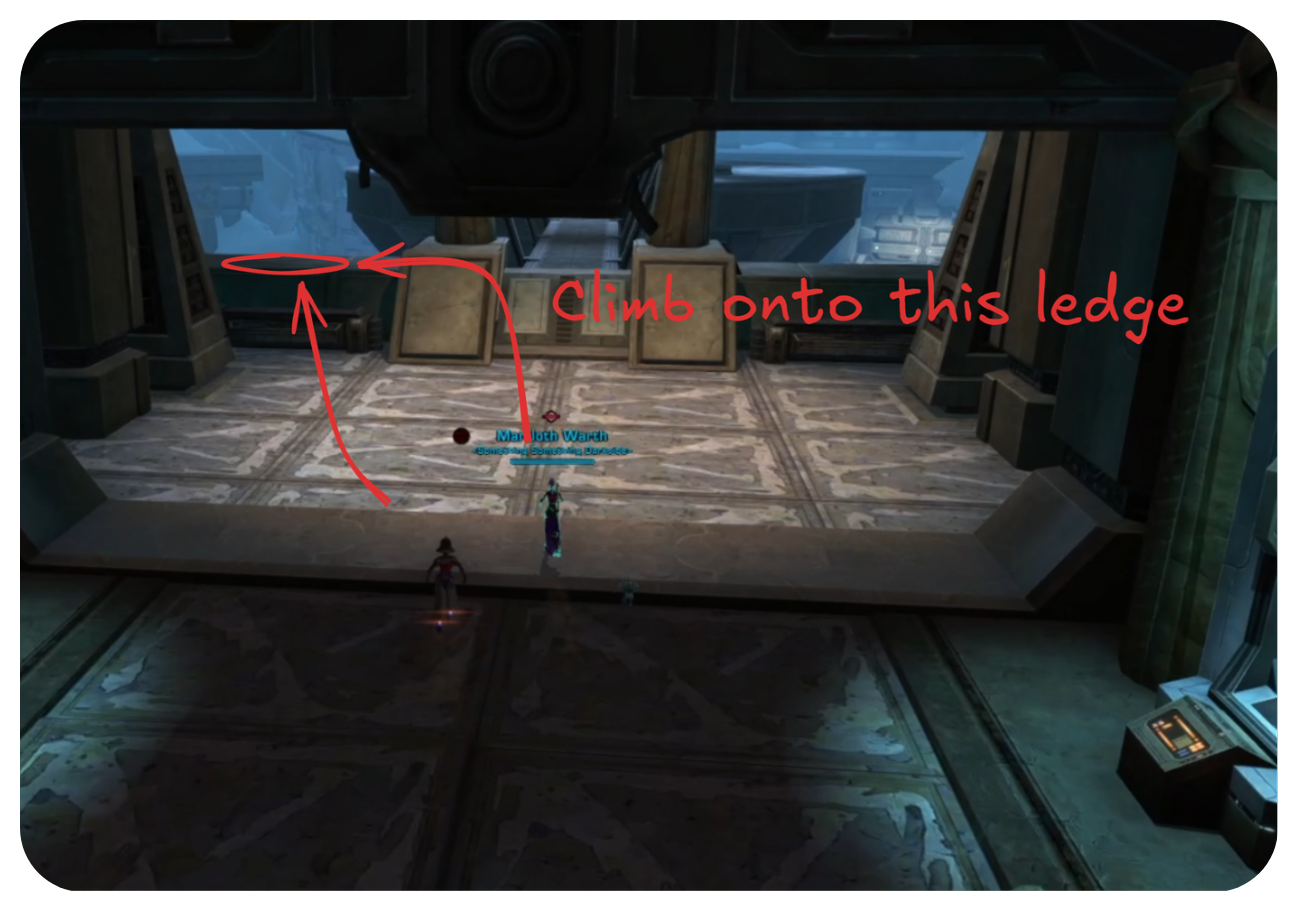

Speed Boost helpful but not required. Some players prefer NOT to jump. Simply speed boost then walk off the ledge as well.
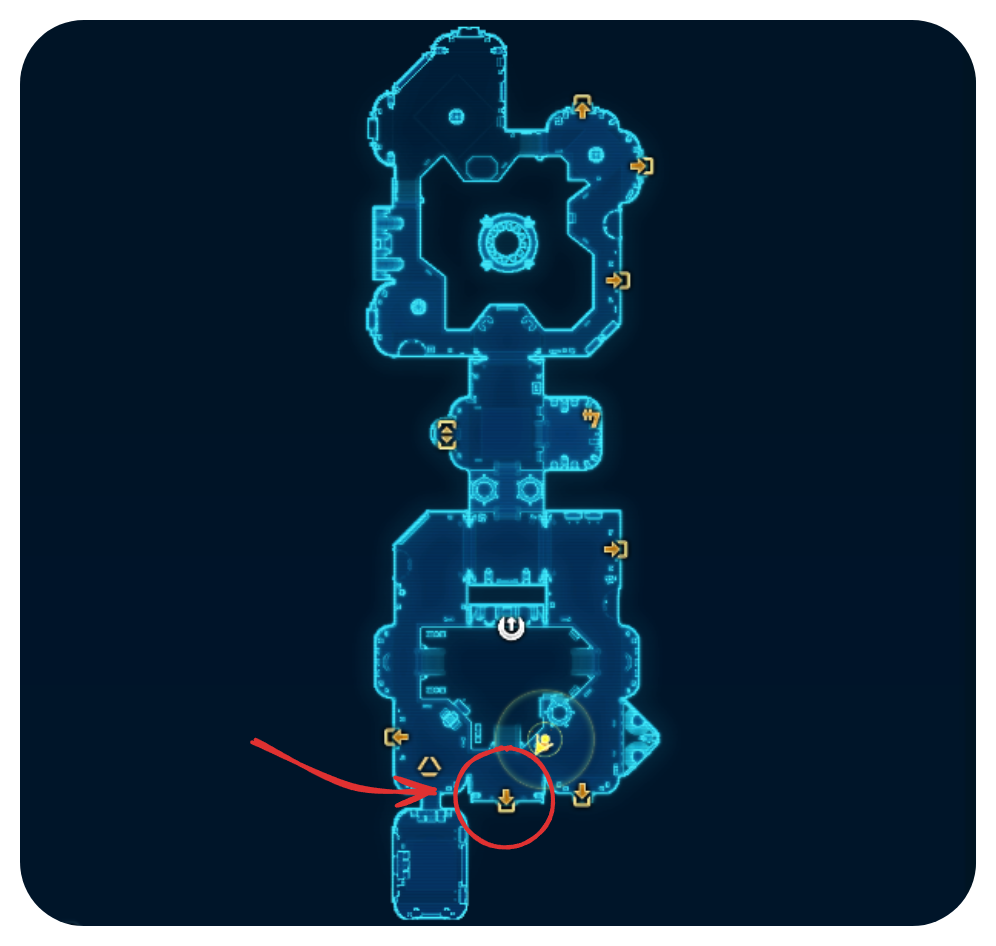
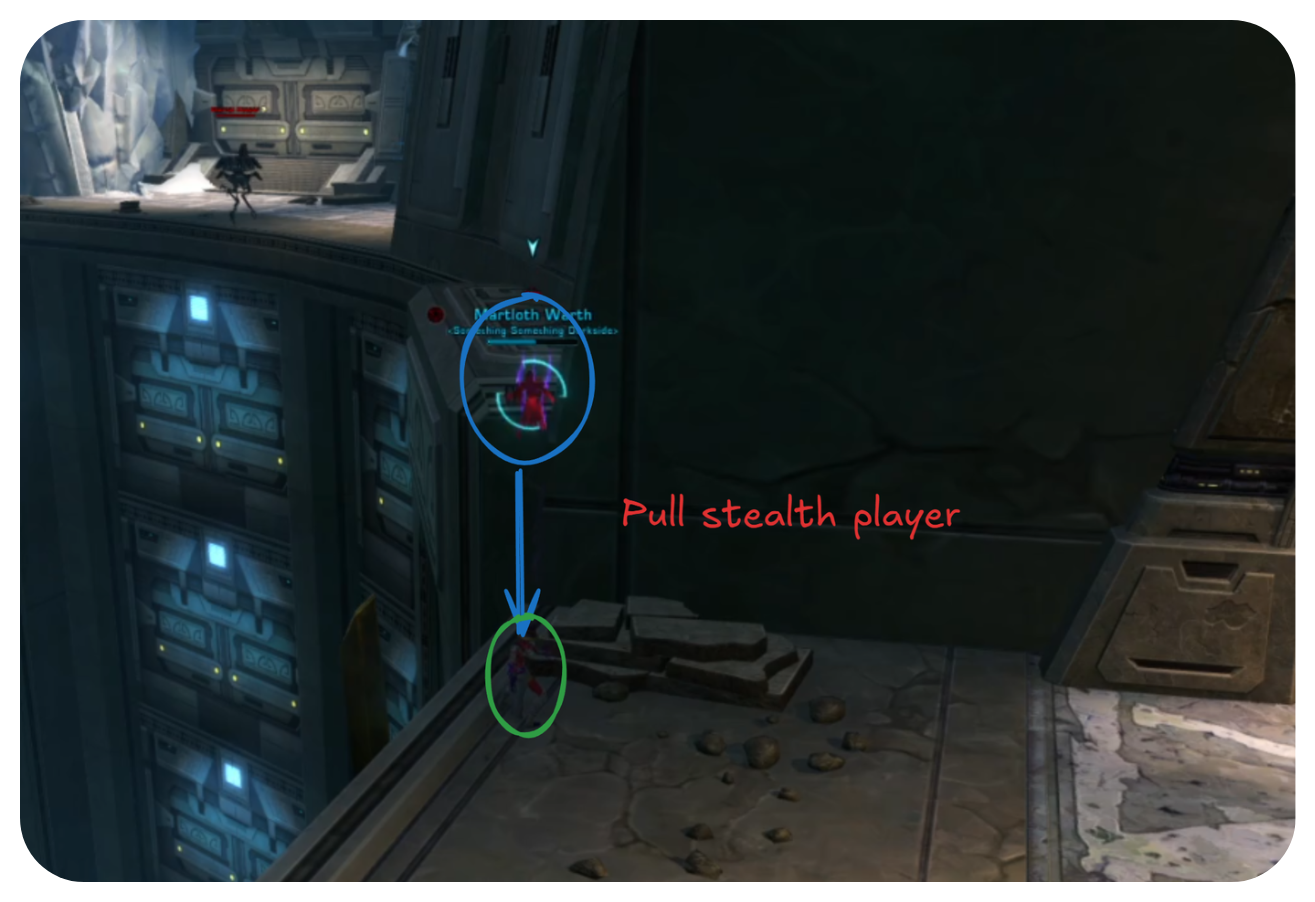
Once landed use out of combat heal to top off health. If you are the puller, then look back for your teammate who needs pulled. When you are done pulling, jump off the ledge to your death. You'll respawn with your teammates at the Speeder Spawn.
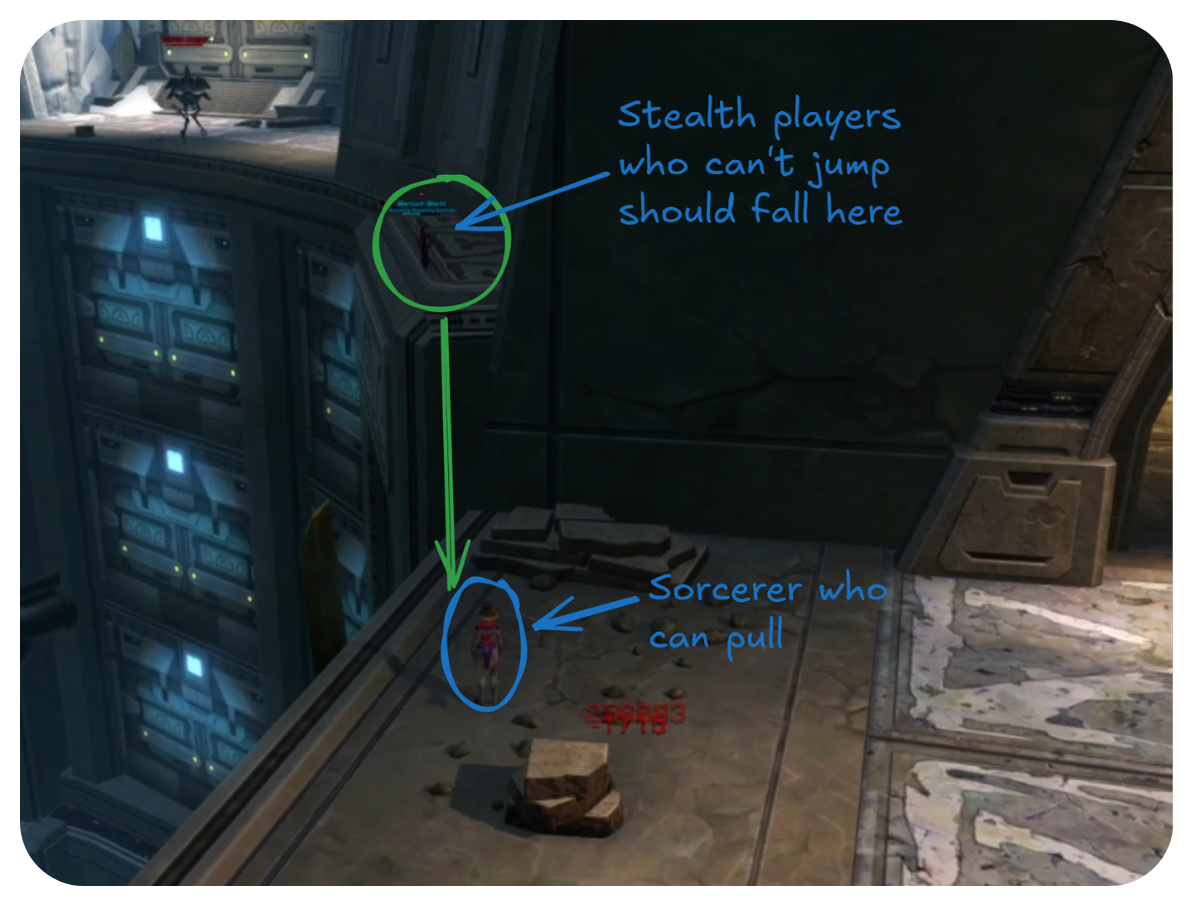
Getting Pulled
If you’re being pulled, instead of jumping across the void, there is a small landing area right under the ledge you jump from. Simply walk off the ledge to land here. Best to walk off backwards if it's your first time. Only once you are on the ledge at the bottom will you be in range of the pull player.
Jump backwards if it's your first time. Look before you jump!
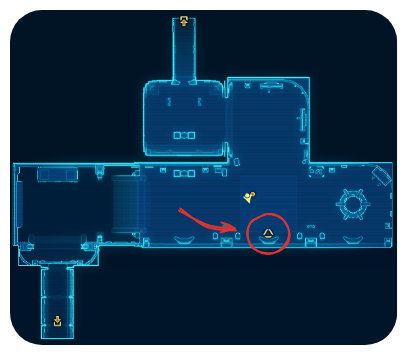
Navigate around the Eternal Keepers to the right side of the map.
Once in the next room, navigate past the Firestalkers to the Gharj Champion Boss area.
Take care not to engage Gharj.